Damage
Damage Sources
Relative path: Damage Source
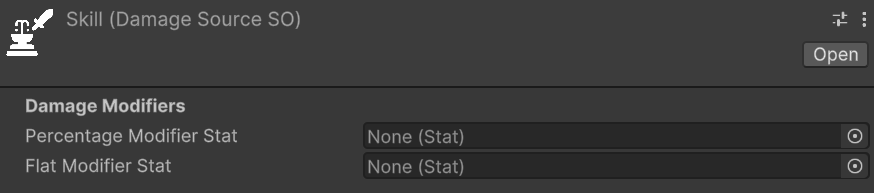
A DamageSourceSO represents the source of the damage. Some examples of DamageSourceSO could be: skill, base attack, fall damage, trap, environmental, etc. The DamageSourceSO is used to categorize the damage and can be used in various mechanics, such as damage modifiers that only apply to specific damage sources, for triggering specific effects when taking damage from a certain source, or for tracking damage statistics based on the source.
An instance of DamageSourceSO, in the inspector, should look like this:
Damage Sources - Modifiers
There are two properties to set in a DamageSourceSO:
- Percentage Modifier Stat: the statistic to consider in an entity to apply percentage, specific damage modifiers for this damage source. Positive values of this statistic increase the damage received from this source, while negative values decrease it.
- Flat Modifier Stat: the statistic to consider in an entity to apply flat, specific damage modifiers for this damage source. Positive values of this statistic increase the damage received from this source, while negative values decrease it.
Warning
If the entity lacks a percentage or flat damage source modifier statistic, an error will be logged when applying damage from that source. Ensure all entities with an EntityHealth component have the statistics referenced in your game's DamageSourceSOs.
A possible way to simplify the management of all the DamageSourceSO modifier stats is to create a StatSet specifically for this purpose, and include it as a Included Stat Set in the various entities' StatSets of your game. This way, you centralize all the DamageSourceSO modifier stats in a single StatSet, and you can easily keep track of them and ensure that they are included in all the relevant entities.
Damage Types
A DamageTypeSO represents the type of damage—such as physical, fire, ice, lightning, or damage-over-time (DoT) effects like bleeding. In the following image you cane see an example of a DamageTypeSO instance in the inspector:
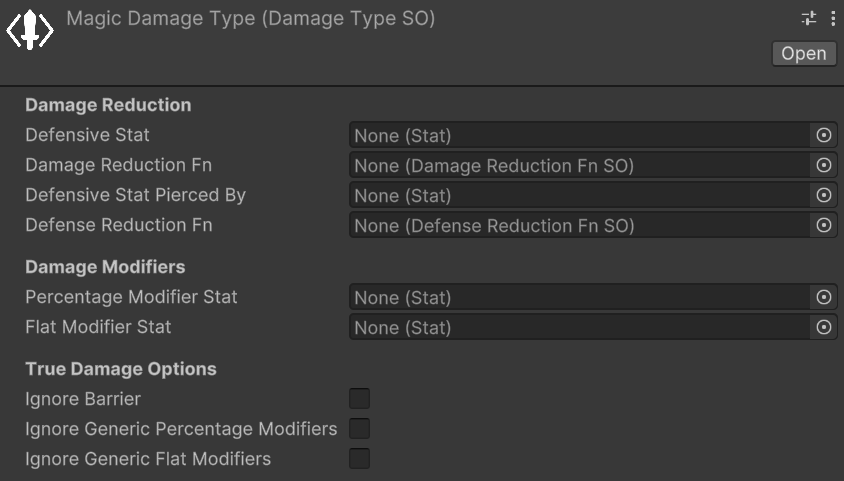
You can notice that the parameters are divided in four sections:
- Damage Mitigation: parameters related to the damage and defense penetration mechanics for this damage type.
- Damage Modifiers: parameters related to flat and percentage damage modifiers for this damage type.
- True Damage Options: parameters related to the true damage options for this damage type.
- Lifesteal: parameters related to the type-specific lifesteal contribution for this damage type.
Note
I recall the Damage Modifiers vs. Stat-Based Damage Mitigation section of the introduction documentation, where I explained the difference between damage mitigation and damage modifiers.
We will now see each of these sections in detail.
Damage Type's Damage Mitigation
The primary use case for DamageTypeSO is implementing entities with varying resistances to specific damage types. This is primarily achieved via Defensive Stats.
For each DamageTypeSO, you can define a defensive statistic that reduces incoming damage of that type. For example, an Armor stat might reduce Physical damage, while a Magic Resistance stat reduces Magic damage.
The value of the defensive stat is fed into the associated Damage Mitigation Fn (function) and used to calculate the actual damage mitigation. The package provides some built-in damage mitigation functions, such as:
- Flat Dmg Mitigation: Reduces damage by a flat amount equal to the defensive stat value multiplied by a constant.
- Percent Dmg Mitigation: Reduces damage by a percentage equal to the defensive stat value.
- Log Dmg Mitigation: Reduces damage in a logarithmic way based on the defensive stat value, providing diminishing returns as the stat increases.
Note
Defensive Stat and Damage Mitigation Fn are optional. However, they must always be configured together: if one is set, the other must be set as well. If only one of them is assigned, a warning will be logged at runtime and the damage mitigation step will be skipped for that DamageTypeSO.
Warning
If the target entity lacks the statistic referenced by Defensive Stat, an error will be logged when applying damage of that type. Ensure that all entities with an EntityHealth component have the defensive statistic referenced by the DamageTypeSOs used in your game.
Let's see all of them in detail.
Damage Mitigation Functions - Flat Dmg Mitigation
Relative path: Dmg Mitigation Functions -> Flat Dmg Mitigation
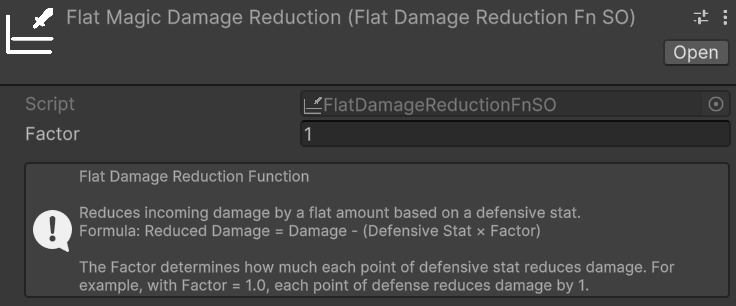
The flat damage mitigation function is the most simple and straightforward one. It reduces damage by a flat amount equal to the defensive stat value multiplied by the Factor specified via the Inspector.
For example:
- Damage Type: Magic damage.
- Defensive Stat for the Magic Damage Type: Magic Resistance.
- Damage Mitigation Function for the Magic Damage Type: Flat Dmg Mitigation with a scaling factor of 2.
In this case, if an entity has Magic Resistance equal to 10, and is about to take 50 Magic damage, the damage mitigation will be equal to 10 (Magic Resistance) * 2 (scaling factor) = 20. So the final damage taken by the entity will be 50 (initial damage) - 20 (damage mitigation) = 30 Magic damage. Clearly, this example assumes that there are no other damage modifications (e.g., neutral damage modifiers).
Use Cases: This function is best suited for games where offensive and defensive stat values are low — close to single digits or tens at most. In these scenarios, the linear relationship between the defensive stat and the damage mitigation makes it trivial to ensure that no entity can completely negate incoming damage, as long as the stat values remain within a controlled range. Percentage or logarithmic reduction functions may yield imprecise or unintuitive results at such coarse-grained stat scales.
Pros:
- Damage mitigation is highly predictable: knowing the defensive stat value and the factor, anyone can instantly calculate the resulting reduction.
- Simple to debug: the math is entirely transparent, making it straightforward to verify that the damage pipeline is working as expected at every step.
- Easy to balance: the linear relationship between the stat and the reduction makes it trivial to tune the factor to achieve the desired game feel.
Cons:
- Simplistic system: this function may not suit games that require nuanced or complex defensive mechanics.
- Risk of complete damage negation: if defensive stat values grow too high relative to typical damage values, entities can become entirely immune to certain damage types. This can happen, for example, if the level difference between attacker and defender is too high.
Damage Mitigation Functions - Percent Dmg Mitigation
Relative path: Dmg Mitigation Functions -> Percentage Dmg Mitigation
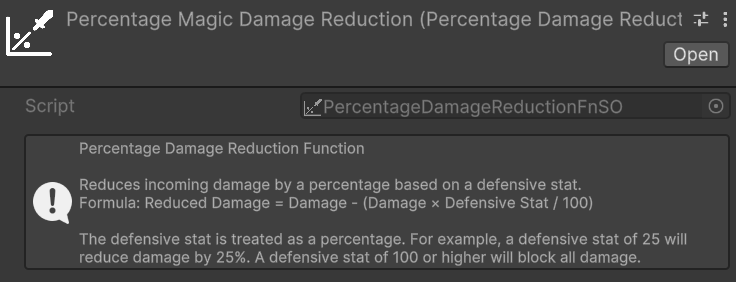
The percentage damage mitigation function reduces incoming damage by a percentage equal to the defensive stat value. For example, if an entity has a defensive stat of 30, it will receive 30% less damage of the associated type.
Use Cases:
- Games where players can face enemies with notable level or power differences. Because the reduction is percentage-based, even a low-level entity with a small but non-zero defensive stat will always receive a proportional reduction, preventing extreme damage scenarios that would arise from large stat disparities between the attacker and the defender.
- Systems that need to be less sensitive than the Flat Dmg Mitigation to the exact magnitude of offensive and defensive stats, while still remaining predictable and easy to balance.
Pros:
- Predictable and straightforward to reason about: a stat value of X directly translates to X% less damage.
- Remains effective regardless of the magnitude of incoming damage: even against a significantly stronger attacker, the same proportional reduction applies, guaranteeing that defense always has a meaningful impact.
Cons:
- High risk of damage immunity at extreme values: once the defensive stat reaches 100, the entity becomes completely immune to that damage type. This can be especially problematic for tank-oriented entities or builds designed to stack defensive stats.
- Can make late-game balancing challenging if stat values are not tightly bounded.
Damage Mitigation Functions - Log Dmg Mitigation
Relative path: Dmg Mitigation Functions -> Log Dmg Mitigation
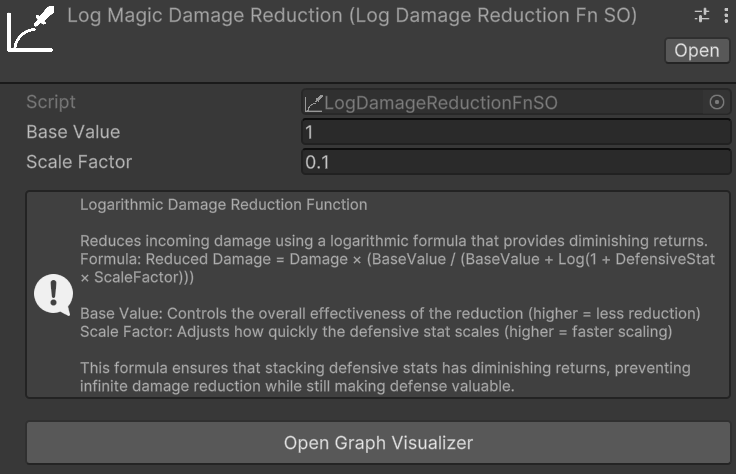
The logarithmic damage mitigation function reduces damage using a logarithmic curve, providing diminishing returns as the defensive stat value increases. A small initial investment in the defensive stat yields a substantial reduction, while further investment produces progressively smaller gains. This makes it theoretically impossible to reach 100% reduction regardless of how high the stat grows.
The Formula
The logarithmic damage mitigation function applies the following formula to compute the final damage taken:
Reduced Damage = Damage × (BaseValue / (BaseValue + Log(1 + DefensiveStat × ScaleFactor)))
Two parameters, configurable directly on the Log Dmg Mitigation asset, control the shape of the curve:
- Base Value: the constant in the denominator of the reduction multiplier. A larger Base Value reduces the relative weight of the logarithmic term, making the reduction curve less aggressive — the same defensive stat value will produce less damage mitigation. Conversely, a smaller Base Value amplifies the effect of the logarithm, yielding stronger reductions even at lower stat values.
- Scale Factor: the multiplier applied to the defensive stat value before computing the logarithm. A larger Scale Factor causes the curve to climb more steeply at low stat values, reaching substantial reductions earlier. A smaller Scale Factor stretches the curve, requiring higher stat values to achieve the same reduction.
Both parameters must be set to strictly positive values.
Log Damage Mitigation Graph
Because the non-linear nature of the formula makes it difficult to reason about the effect of Base Value and Scale Factor at a glance, the package includes a dedicated visualization window. You can open it in two ways:
- Clicking the Open Graph Visualizer button in the inspector of any
Log Dmg Mitigationasset. - From the Unity menu:
Window → Astra Health → Log Damage Mitigation Graph.
The graph visualizer window should look like this:
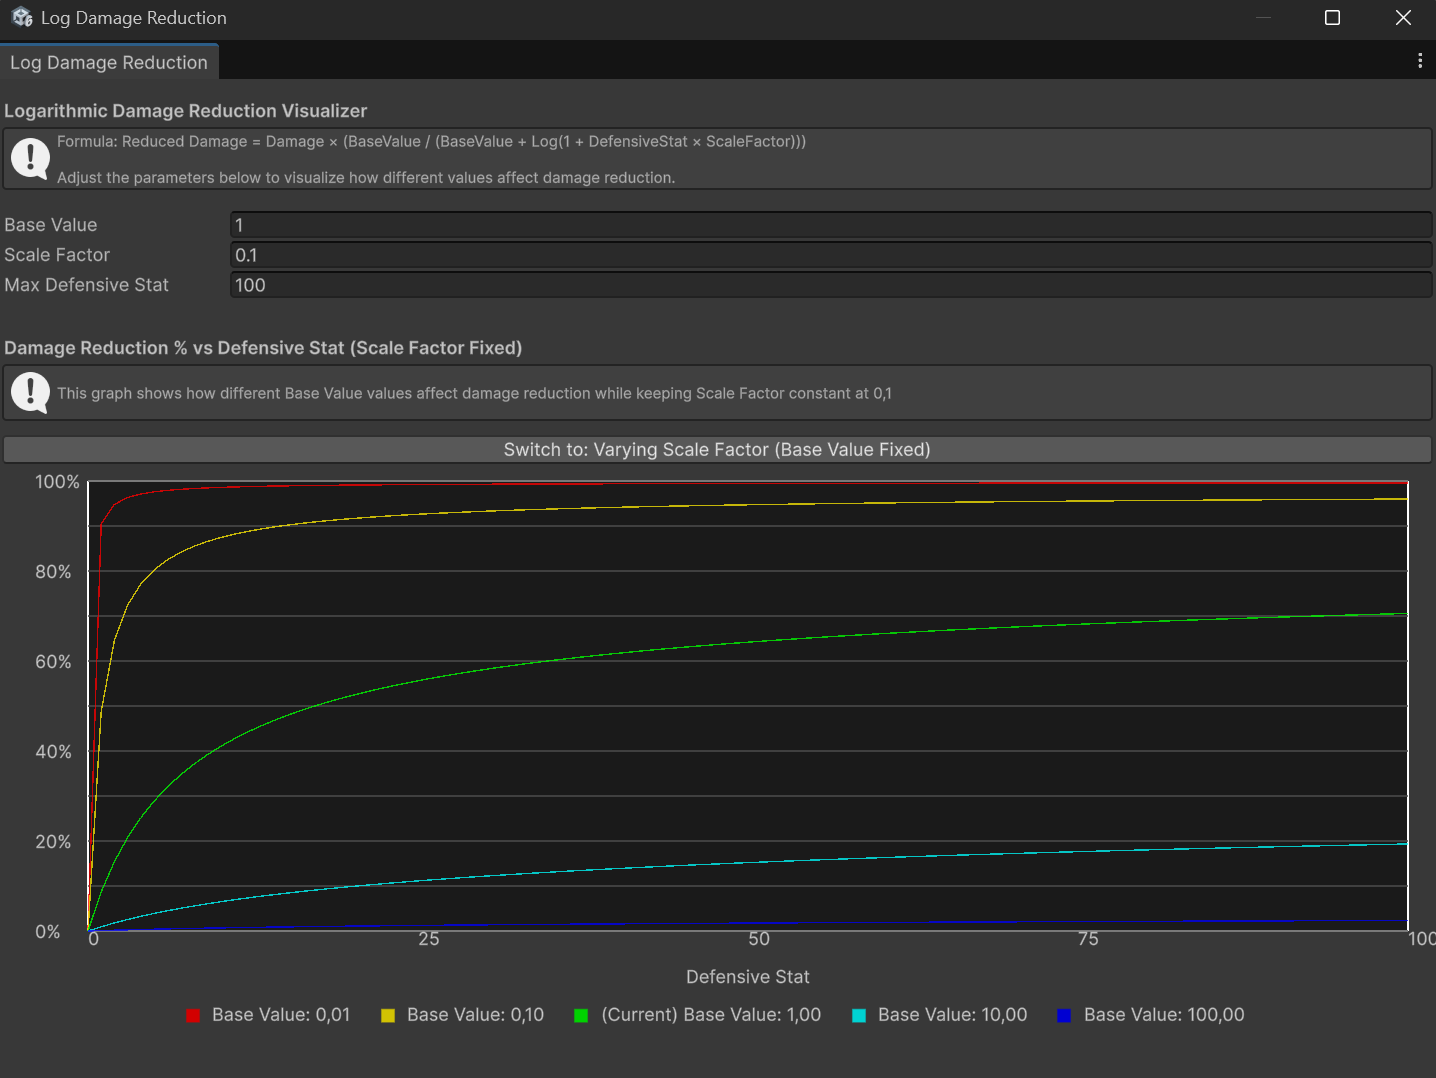
Once the window is open, three fields let you configure the visualization:
- Base Value: the reference Base Value to analyze, matching the value you have set on your asset.
- Scale Factor: the reference Scale Factor to analyze, matching the value you have set on your asset.
- Max Defensive Stat: the upper bound of the X-axis, i.e., the maximum defensive stat value to plot.
The window displays one graph at a time, plotting Damage Mitigation % on the Y-axis and the Defensive Stat value on the X-axis. A toggle button lets you switch between two views:
Varying Base Value (Scale Factor Fixed) — shows five curves corresponding to different Base Values centered around the reference value you configured, while Scale Factor is held constant. This lets you compare how increasing or decreasing Base Value shifts the reduction curve, making it easier to find a value that achieves the desired behavior for your game's stat range. Click Switch to: Varying Scale Factor (Base Value Fixed) to move to the other view.
Varying Scale Factor (Base Value Fixed) — shows five curves corresponding to different Scale Factors centered around the reference value, while Base Value is held constant. This lets you compare how Scale Factor affects the steepness of the initial climb of the curve. Click Switch to: Varying Base Value (Scale Factor Fixed) to return to the previous view.
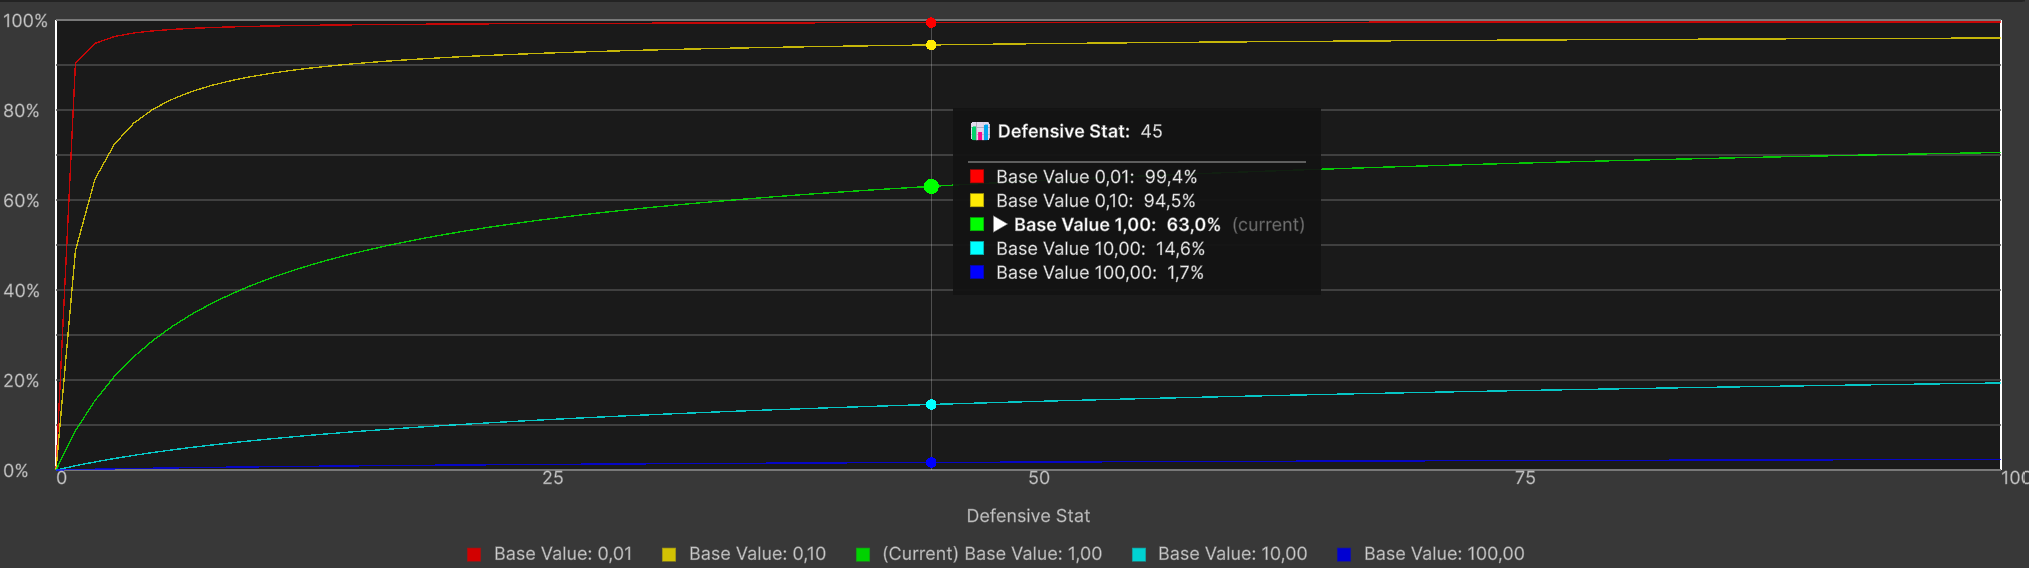
The legend labels each curve with its exact parameter value, and the middle curve (marked Current) corresponds to the reference value you entered. Hovering the mouse over the graph shows a tooltip with the exact damage mitigation percentage produced by each curve for the defensive stat value under the cursor, like this:
Use Cases:
- RPGs with wide stat ranges and long progression curves — for example, games with levels 1 through 100 or beyond — where both offensive and defensive stats grow substantially over time. The diminishing returns ensure that no entity can become completely immune to a damage type simply by stacking the defensive stat.
- Games where investing in defense should always be viable, but never dominant: players are rewarded for defensive investment, yet the diminishing returns naturally discourage over-specialization and keep combat meaningful at all stages.
- Projects that need a self-capping damage mitigation formula without enforcing a hard maximum: the logarithmic curve naturally prevents extreme values from causing damage immunity, reducing the need for manual clamping or caps in the game design.
Pros:
- Inherently prevents complete damage immunity: the logarithmic curve approaches but never actually reaches 100% reduction, no matter how high the defensive stat grows.
- Scales gracefully across wide stat ranges, remaining meaningful at every stage of the game without requiring constant rebalancing.
- Discourages over-specialization in defense: the diminishing returns act as a natural soft cap, making it progressively less efficient to stack defensive stats beyond a certain point.
Cons:
- Less intuitive than flat or percentage reduction: players and designers cannot easily predict the exact damage mitigation for a given stat value at a glance — the log graph window tool is typically needed.
- More complex to debug and tune: the non-linear relationship between the stat and the reduction requires more careful analysis and testing during development.
Damage Mitigation Functions - Custom Dmg Mitigation Functions
If you want to provide your own custom damage mitigation function, you can create a new class that inherits from DamageMitigationFnSO and implement the CalculateReducedDamage method. Remember to use the CreateAssetMenu attribute (or the MenuItem attribute) to make it creatable from the Unity editor.
You can take a look at the existing damage mitigation functions implementations for reference.
Defense Penetration
Defense penetration allows the damage dealer to partially bypass the target's defensive stat before damage mitigation is calculated. This mechanism is useful for implementing mechanics such as armor penetration or magic penetration, where an attacker can reduce the effective defenses of the target.
Two optional parameters of the DamageTypeSO control this behavior:
- Defensive Stat Pierced By: the statistic on the damage dealer that pierces the target's defensive stat. For example, an
Armor Penetrationstat might pierce theArmorstat of the target. - Defense Penetration Fn: the function that computes how the piercing stat lowers the target's defensive stat. The resulting reduced defensive stat value is then passed to the Damage Mitigation Fn in place of the original value.
Note
Defensive Stat Pierced By and Defense Penetration Fn are optional. However, they must always be configured together: if one is set, the other must be set as well. If only one of them is assigned, a warning will be logged at runtime and the defense penetration step will be skipped for that DamageTypeSO.
Warning
If the damage dealer entity lacks the statistic referenced by Defensive Stat Pierced By, an error will be logged when applying damage of that type. Ensure that all entities capable of dealing damage of this type have the relevant piercing statistic.
To illustrate how defense penetration interacts with the rest of the damage pipeline, consider the following example:
- Damage Type: Physical damage.
- Defensive Stat for the Physical Damage Type: Armor.
- Damage Mitigation Function for the Physical Damage Type: Flat Dmg Mitigation with a factor of 1.
- Defensive Stat Pierced By: Armor Penetration.
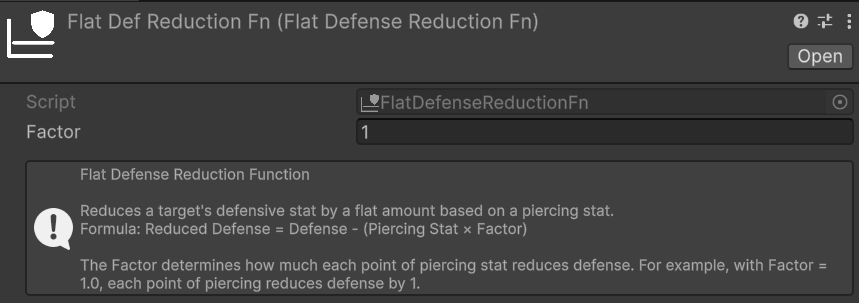
- Defense Penetration Fn: Flat Def Penetration with a factor of 1.
In this case, if the target has Armor equal to 30 and the attacker has Armor Penetration equal to 10, the effective Armor value fed into the Damage Mitigation Fn will be 30 (Armor) − 10 (Armor Penetration) × 1 (factor) = 20. So, if the incoming damage is 80, the final damage taken will be 80 − 20 (effective Armor) = 60 Physical damage. This example assumes no other damage modifications are active.
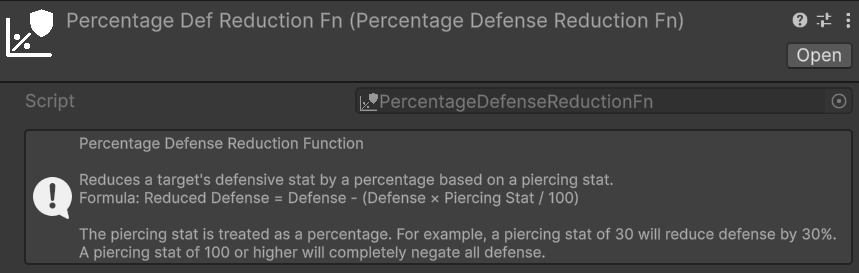
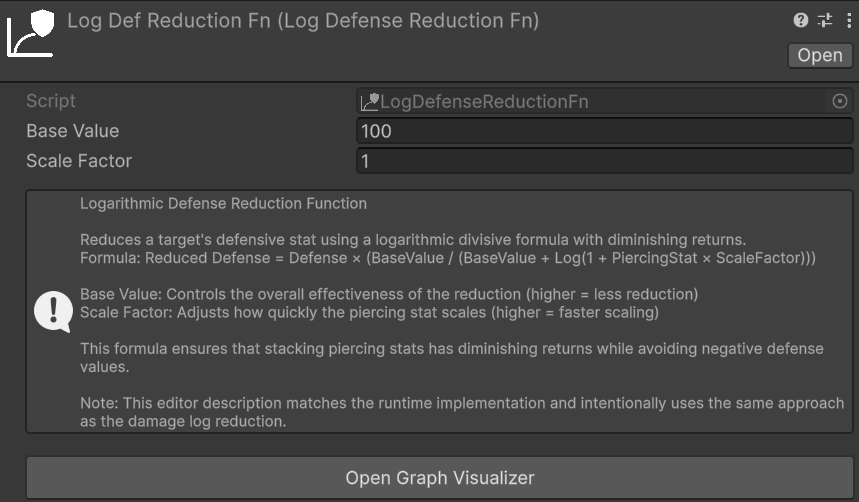
The package provides three built-in Defense Penetration Functions — Flat, Percentage, and Logarithmic — that work in a fully analogous way to their counterparts described in the Damage Mitigation section above. The parameters, trade-offs, and use cases of each variant are the same; the only difference is that these functions operate on the defensive stat value rather than directly on the damage amount. For a detailed description of each, refer to the Damage Mitigation section.
Relative path: Def Penetration Functions -> Flat Def Penetration
Relative path: Def Penetration Functions -> Percentage Def Penetration
Relative path: Def Penetration Functions -> Log Def Penetration
If none of the built-in Defense Penetration Functions suits your needs, you can implement a custom one by creating a class that inherits from DefensePenetrationFnSO and implementing the CalculateReducedDefense method. As with the Damage Mitigation Functions, remember to use the CreateAssetMenu attribute (or the MenuItem attribute) to make it creatable from the Unity editor.
Damage Type's Damage Modifiers
The Percentage Modifier Stat and Flat Modifier Stat fields in this section let you assign stat-based damage modifiers that apply specifically when an entity receives damage of this DamageTypeSO. Assigning a positive value to either stat increases the damage received from this type; a negative value decreases it. For a full explanation of how all damage modifier categories work and how they stack together, see the Damage Modifiers section.
A possible way to simplify the management of all the DamageTypeSO modifier stats is to create a StatSet specifically for this purpose, and include it as a Included Stat Set in the various entities' StatSets of your game. This way, you centralize all the DamageTypeSO modifier stats in a single StatSet, and you can easily keep track of them and ensure that they are included in all the relevant entities.
Damage Type's True Damage Options
The True Damage Options section of a DamageTypeSO exposes three boolean flags that allow selective bypasses for individual stages of the damage pipeline. They are the primary tool for implementing "true damage" mechanics — damage that partially or entirely skips specific mitigation layers — without requiring a custom DamageCalculationStrategy.
Ignore Barrier: when enabled, the
ApplyBarrierStepis skipped entirely for thisDamageTypeSO. Damage bypasses the target's barrier and is applied directly to its health pool. Use this for damage types that are meant to be unavoidable through shielding — for example, a pure true damage type, fall damage, or damage-over-time effects that should not interact with temporary shields.Ignore Generic Percentage Modifiers: when enabled, the
ApplyPercentageDmgModifiersStepskips the Generic Percentage Damage Modification Stat configured inAstraHealthConfigSO. Percentage modifiers from theDamageSourceSOor from thisDamageTypeSOitself still apply normally.Ignore Generic Flat Modifiers: when enabled, the
ApplyFlatDmgModifiersStepskips the Generic Flat Damage Modification Stat configured inAstraHealthConfigSO. Flat modifiers from theDamageSourceSOor from thisDamageTypeSOitself still apply normally.
Note
Ignore Generic Percentage Modifiers and Ignore Generic Flat Modifiers bypass only the generic modifier layer — the global stats configured in AstraHealthConfigSO. Source-specific and type-specific modifier stats are never bypassed by these flags and always participate in the pipeline normally.
However, if a DamageSourceSO or this DamageTypeSO has no modifier stats assigned, those layers contribute nothing by construction — which effectively produces the same result as a bypass. Enabling all three flags while also leaving all modifier stats unset on the source and type produces a fully modifier-free damage type.
Tip
To create a damage type that is also unaffected by any defensive stat, simply leave Defensive Stat and Damage Mitigation Fn empty. The ApplyDefenseStep has nothing to compute and is skipped. Combined with the three True Damage Option flags and no modifier stats, this defines a fully unmitigated damage type.
Damage Type's Lifesteal
Each DamageTypeSO exposes a Lifesteal field containing a LifestealStatConfig.
When its Lifesteal Stat is configured and the damage dealer has that stat in its StatSet, successful hits of this damage type heal the attacker for a percentage of the selected damage amount. The same three parameters are available as for generic lifesteal:
- Lifesteal Stat
- Lifesteal Source
- Amount Selector
This contribution applies only to hits whose resolved DamageTypeSO is this asset. It stacks with the Generic Lifesteal configured in AstraHealthConfigSO.
For the full behavior — including how this stacks with generic lifesteal and how the Unify Lifesteal Heals flag affects the resulting healing events — see Lifesteal.
Damage Mitigation Graph
The Damage Mitigation Graph is an Editor window that plots how damage received scales as a function of a defender's defensive stat value. Use it to visually verify the behavior of your damage mitigation and defense penetration configuration, preview the impact of armor penetration at different stat values, and compare clamped (defensive stat) vs. unclamped (defensive stat) curves.
To open it, click the Open Damage Mitigation Graph button in the inspector of any DamageTypeSO. Once opened, it should look something like this:
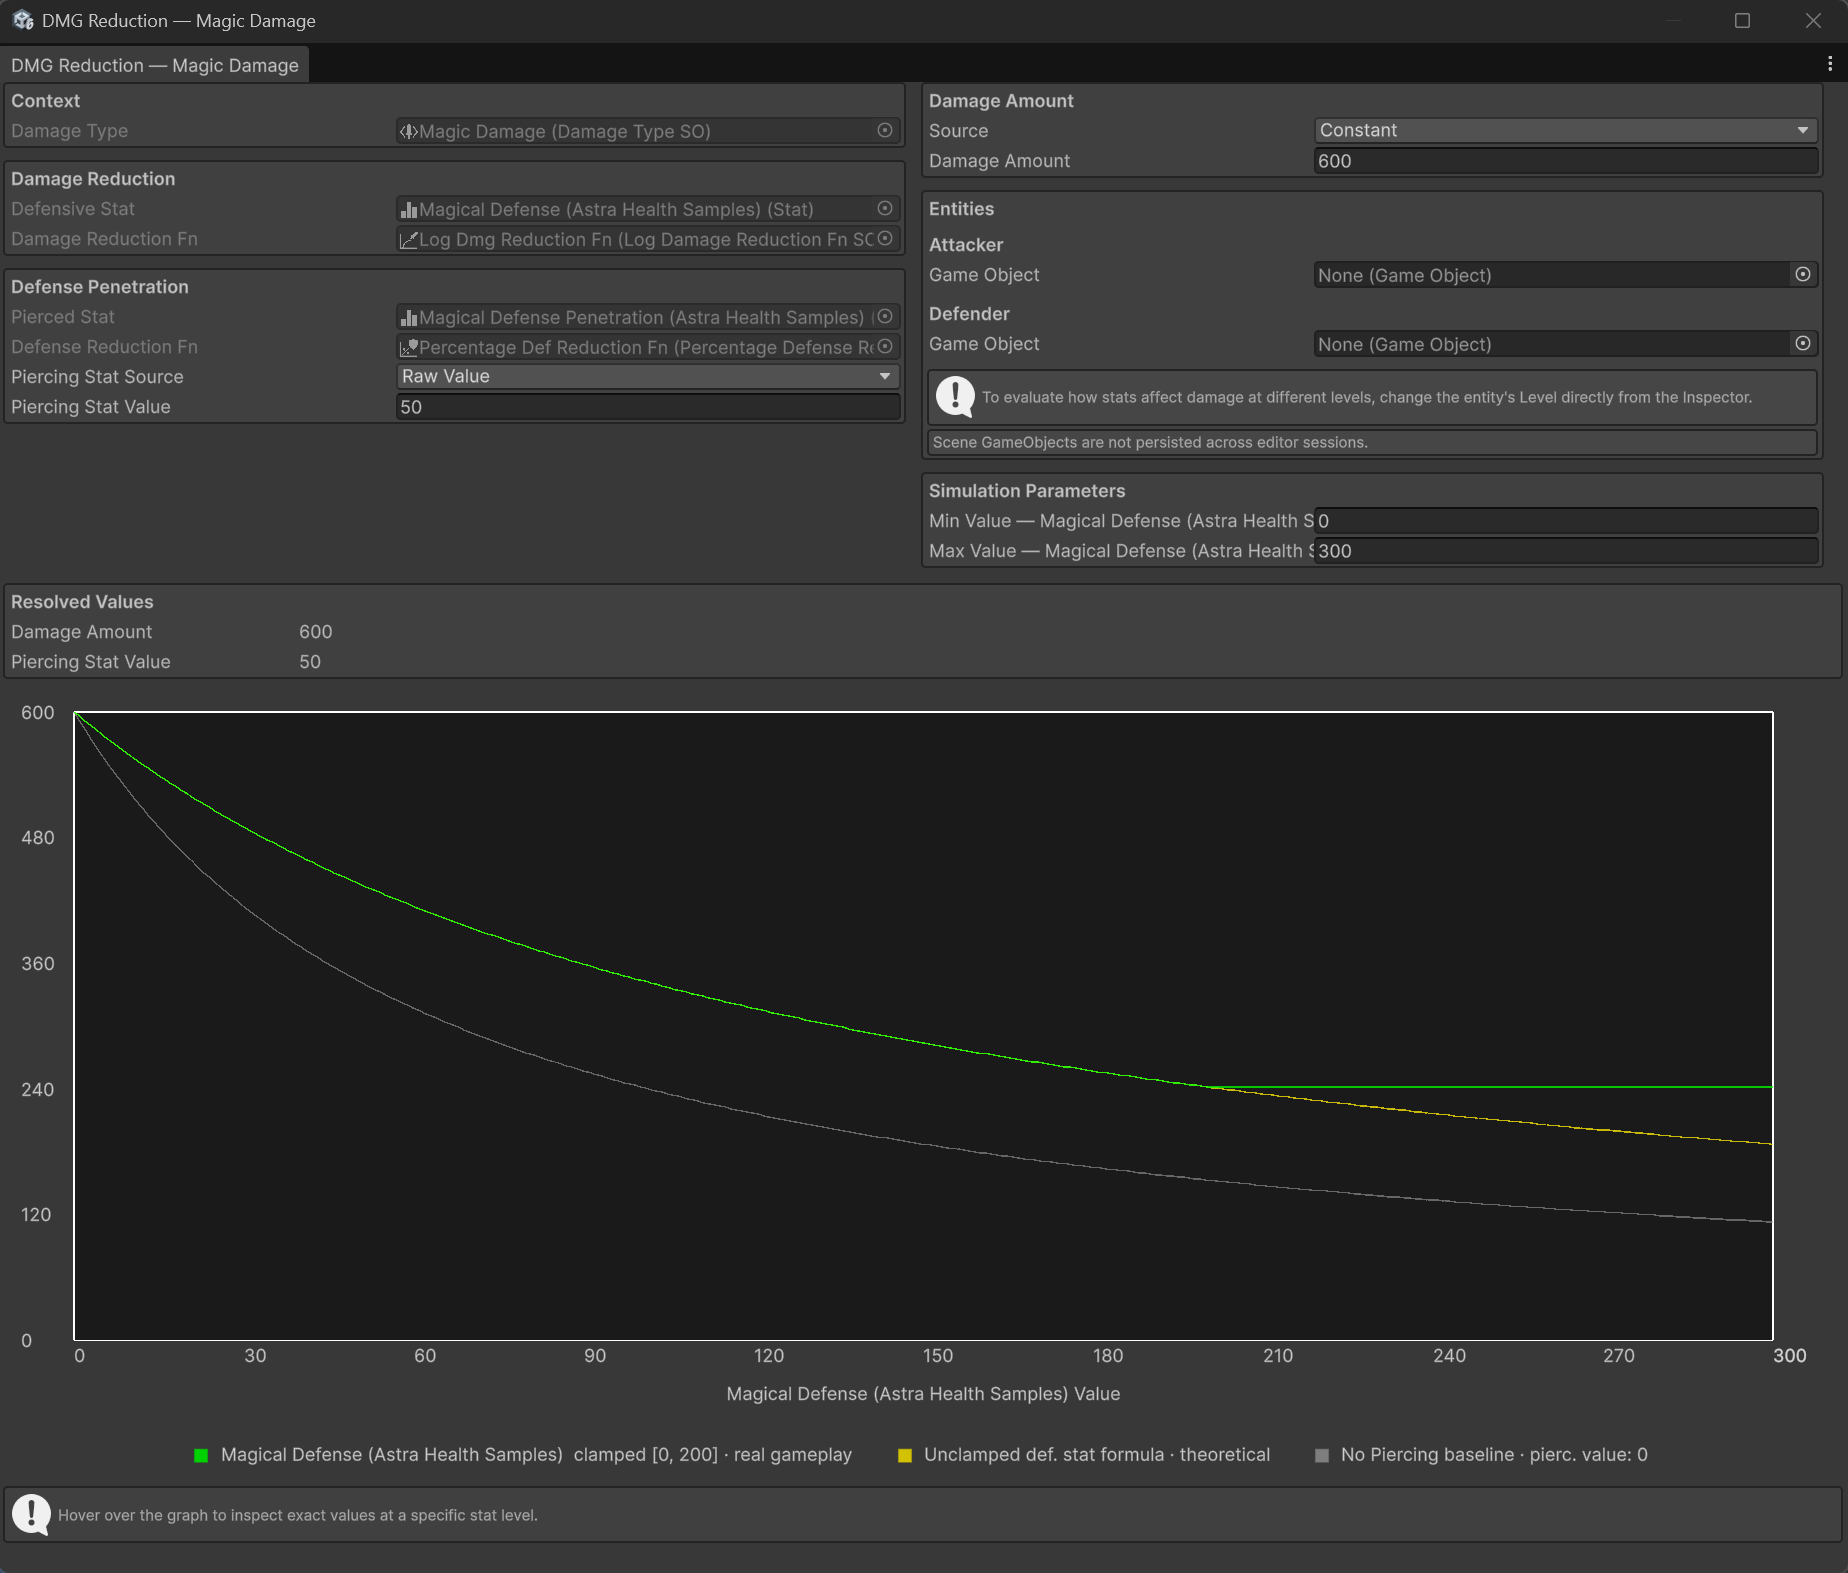
Obviously the plot and the values will vary based on the specific configuration of the DamageTypeSO you have.
All configuration fields — Defensive Stat, Damage Mitigation Fn, Pierced Stat, and Defense Penetration Fn — are read-only inside the window and reflect the asset directly. To change any of them, edit the DamageTypeSO.
Note
The Damage Mitigation Graph is a simulation tool only. No asset or scene object is modified when you change values inside the window.
Control Panel
The window is divided into two equal columns that scale with the window width. Below them are the Resolved Values panel, an optional Defender Breakdown panel (shown only when a Defender is assigned in the Entities section), and the graph itself.
Context (read-only)
Displays the DamageTypeSO that opened the window as a disabled field. It cannot be reassigned here — to analyze a different asset, open its graph from its own inspector.
Damage Mitigation
| Field | Description |
|---|---|
| Defensive Stat | The stat whose value sweeps the X axis of the graph. Read-only — sourced directly from the DamageTypeSO. To change it, edit the asset. |
| Damage Mitigation Fn | The DamageMitigationFnSO that converts (damage, effectiveDefense) into finalDamage. Read-only — sourced directly from the DamageTypeSO. To change it, edit the asset. |
If either field is left empty, a warning is shown and the graph is not drawn.
Defense Penetration
| Field | Description |
|---|---|
| Pierced Stat | The stat on the attacker that provides armor penetration, read-only — sourced from DamageTypeSO.DefensiveStatPiercedBy. To change it, edit the asset. |
| Defense Penetration Fn | Optional DefensePenetrationFnSO that reduces the defender's stat before damage mitigation is applied. Read-only — sourced directly from the DamageTypeSO. To change it, edit the asset. When assigned, a Piercing Stat Source selector appears. |
The Piercing Stat Source controls where the piercing stat value comes from:
| Source | Description |
|---|---|
| Raw Value | A plain number field. Type the piercing stat value directly. |
| Growth Formula | A GrowthFormula asset plus a Level field clamped to the formula's valid range. The resolved value is displayed inline. |
| Class at Level | A Class asset with either a constant level integer or a runtime IntVar. The piercing stat is read from DamageTypeSO.DefensiveStatPiercedBy for that class at the given level. Requires Defensive Stat Pierced By to be set on both the Class and DamageTypeSO assets. |
| From Attacker | Reads DamageTypeSO.DefensiveStatPiercedBy directly from the Attacker entity set in the Entities section. Requires Defensive Stat Pierced By to be set on the DamageTypeSO asset and an Attacker to be assigned. The Attacker must also have the Defensive Stat Pierced By stat in its EntityStats component. |
Note
If no Defense Penetration Fn is assigned, the Piercing Stat Source controls are hidden and the grey baseline line is not drawn on the graph.
Damage Amount
| Source | Description |
|---|---|
| Constant | A plain number field. Defaults to 100. |
| Scaling Formula | A ScalingFormula asset evaluated against the Attacker and/or Defender entities configured in the Entities section. Info panels in the window list which entity components the formula requires. |
Entities
| Field | Description |
|---|---|
| Attacker | An in-scene GameObject with EntityCore. Required when Damage Amount source is Scaling Formula or Piercing Stat Source is From Attacker. |
| Defender | An in-scene GameObject with EntityCore and EntityStats. When assigned, the Defender Breakdown panel appears below the Resolved Values panel. |
Tip
To simulate how the graph changes at different entity levels, modify the entity's Level field directly in the Inspector while the window is open. The graph updates in real time. Level controls are intentionally absent from the window itself to avoid triggering OnEntityLevelUp / OnEntityLevelDown events while interacting with the graph window.
Simulation Parameters
| Field | Description |
|---|---|
| Min Value — {stat name} | Left bound of the X axis. Defaults to 0. Always editable, regardless of whether the Defensive Stat has a Min Value defined. |
| Max Value — {stat name} | Right bound of the X axis. Always editable. |
Reading the Graph
The graph plots Damage Received on the Y axis and the Defensive Stat Value on the X axis. Up to three lines are drawn simultaneously:
| Line | Color | Condition | What it represents |
|---|---|---|---|
| Real gameplay | Green | Always | Damage received as the stat grows, with the stat clamped to its configured bounds (if any). This is the primary reference curve — it reflects the exact behavior any entity can exhibit in-game. When the stat has no bounds configured, this line coincides with the unclamped formula and is the only curve shown. |
| Unclamped formula | Yellow | Only when the Defensive Stat has a Min Value and/or Max Value | Same formula but with the stat not clamped to its bounds — useful for understanding the theoretical shape of the reduction function and how much the configured bounds constrain it. Only shown when it meaningfully differs from the green line. It may happen that you still see only the green line if the bounds do not affect the outcome (aka. the two lines coincide). |
| No-piercing baseline | Grey | Only when Defense Penetration Fn is assigned and effective piercing ≠ 0 | The damage curve with piercing forced to zero. Lets you immediately see how much the configured penetration shifts the outcome relative to a no-penetration scenario. |
The legend below the graph labels each active line with its color and — for the green line — the exact bound(s) at which the stat is clamped.
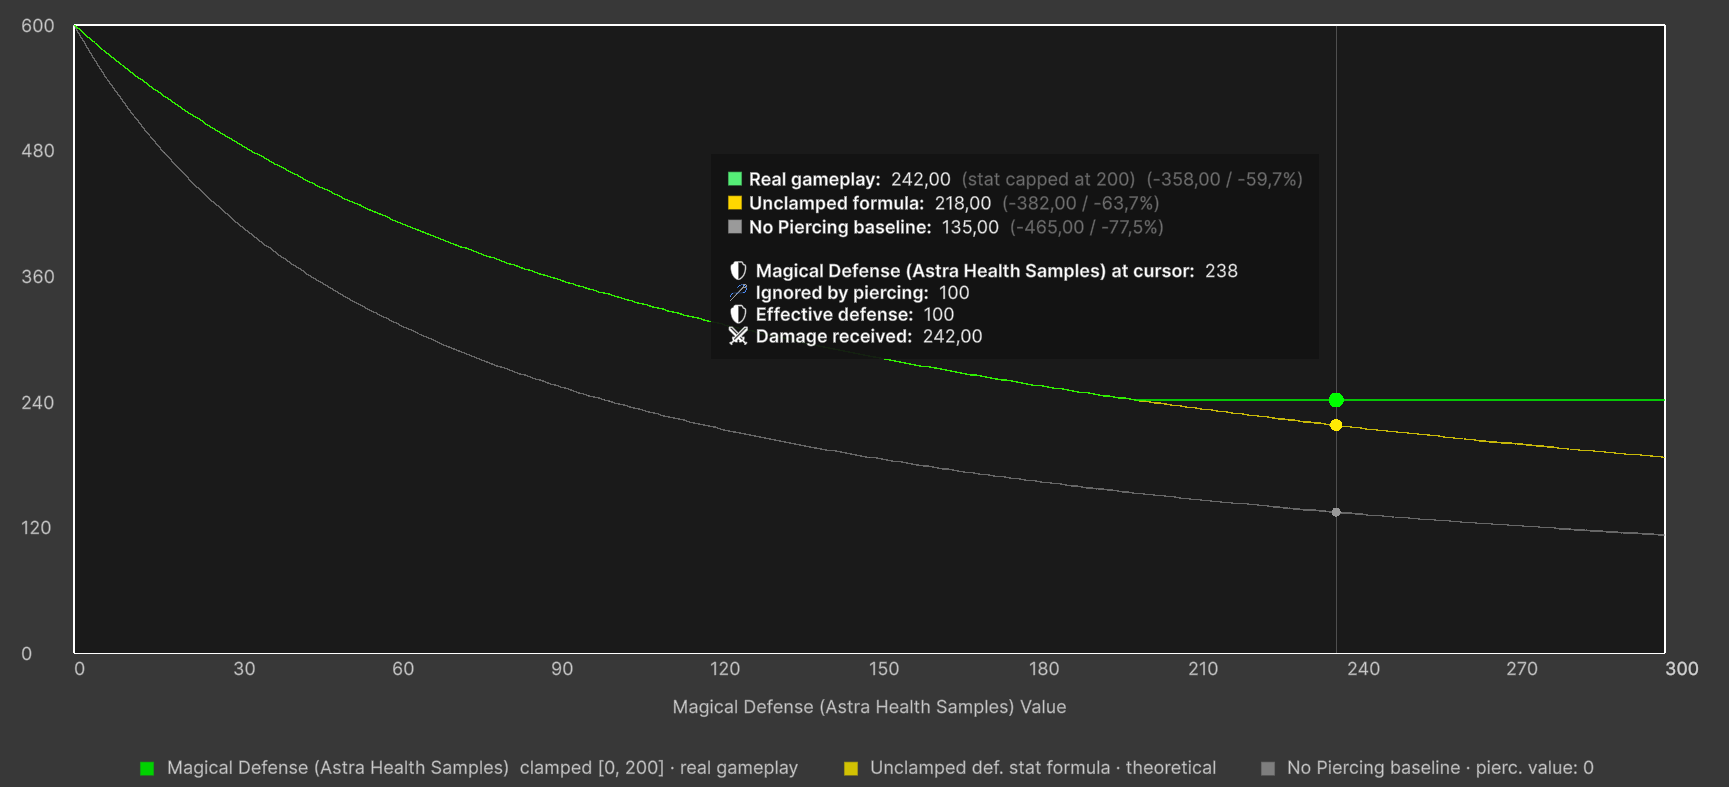
Hover tooltip — moving the mouse over the graph shows a tooltip with, for each active line, the damage received and the absolute and percentage reduction at the hovered stat value. The detail rows also show the raw defensive stat value at the cursor and, when a DefensePenetrationFnSO is set, the portion of the stat ignored by piercing and the resulting effective defense.
It should look like this:
Resolved Values and Defender Breakdown
The Resolved Values panel, always visible below the control columns, shows the values actually fed into the graph — the resolved damage amount and the resolved piercing stat value. If either resolution fails (e.g., a required entity is missing or a formula throws an exception), an error message is shown here and the graph is suppressed.
When a Defender is assigned with EntityCore and EntityStats, the Defender Breakdown panel appears alongside the Resolved Values panel. It provides a point-in-time snapshot of the exact damage calculation for the defender at its current in-scene stat values:
| Row | Description |
|---|---|
| Damage Amount | The resolved incoming damage |
| Piercing Stat Value | The resolved piercing value |
{stat.name} (defender) |
The defender's current defensive stat value |
| Defense Reduced by Piercing | How much of the defensive stat is bypassed by the piercing value (only when Defense Penetration Fn is set) |
Effective {stat.name} |
The final defensive stat fed into the damage mitigation function (only when Defense Penetration Fn is set) |
| Final Damage Received | The final damage the defender would receive at its current level and stats |
| Damage Mitigation (abs / %) | The absolute and percentage difference between raw and final damage |
The breakdown reflects the Defender's current in-scene stat values at its current level. To see how the numbers change at a different level, modify the entity's Level field directly in the Inspector as described above.
Here is a screenshot of the Defender Breakdown panel in action:
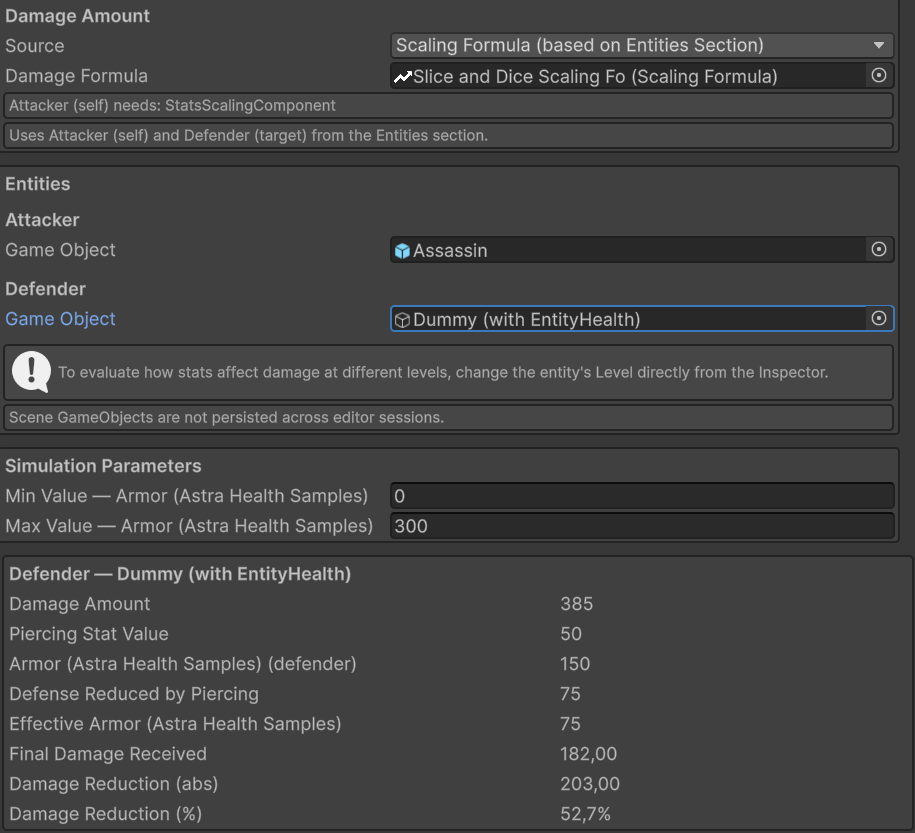
Notice that a ScalingFormula is used for the damage amount, the Dummy entity set as Defender in the Entities section, and the Defender Breakdown panel on the bottom showing the exact damage calculation for the Defender based on its current stats and level.
Dealing Damage to an Entity
The API method you will use the most with this package is certainly TakeDamage, whose responsibility is to apply damage to the entity, taking into account modifiers, immunity, the damage calculation strategy, and other relevant mechanics. This method takes a PreDamageContext as input.
The recommended way via code to inflict damage on an entity is as follows:
- Construct an instance of
PreDamageContextwith all relevant information about the damage you intend to inflict through its fluent builder. - Call
TakeDamagepassing the newly constructed context.
Suppose we are implementing a skill that deals 50 fire damage to the target. The code to apply damage to the target could be the following:
// Assuming that:
// - dmgType is a DamageType representing fire damage
// - dmgSource is a DamageSource representing the damage coming from a skill
// - target is the EntityCore that we want to damage
// - skillCaster is the EntityCore that casts the skill

// first we ensure that the target has an EntityHealth component
if (target.TryGetComponent(out EntityHealth targetHealth)) {
    // then we build the PreDamageContext with all the relevant information
    var preDamageContext = PreDamageContext.Builder
            .WithAmount(50)
            .WithType(dmgType)
            .WithSource(dmgSource)
            .WithTarget(target)
            .WithDealer(skillCaster)   // optional
            .Build();

    // finally, we call TakeDamage to apply the damage to the target
    targetHealth.TakeDamage(preDamageContext);
}
Thanks to the PreDamageContext fluent builder, the IDE will automatically suggest the fields to fill in one at a time. As long as it presents them one at a time, it means they are required fields. If instead it presents more than one at a time, it means those fields are optional, and you can decide whether to fill them in or build the context without them. Optional fields include the damage dealer (WithDealer), the critical hit flag, the critical multiplier, the instigator (WithInstigator), and the reactability flag (WithIsReactable). In the example, for simplicity, I did not fill in these fields.
Now, we know that hardcoding the damage value directly in the code is not a good practice. Let's see how to use a ScalingFormula to dynamically calculate the amount of damage to inflict. The step builder creation would become the following:
// Assuming that scalingFormula is a ScalingFormula that calculates the damage amount based on the skill caster's stats...

// ...we calculate the damage amount by evaluating the scaling formula
long damageAmount = scalingFormula.CalculateValue(skillCaster);
var preDamageContext = PreDamageContext.Builder
        .WithAmount(damageAmount)
        .WithType(dmgType)
        .WithSource(dmgSource)
        .WithTarget(target)
        .WithDealer(skillCaster)   // optional
        .Build();
Damage Modifiers
Damage modifiers are a flexible tool for implementing mechanics such as resistances, weaknesses, buffs, and debuffs that affect how much damage an entity receives. Unlike Defensive Stat-Based Damage Mitigation, damage modifiers are off by default — their stats default to 0 — and can both increase and decrease the damage amount.
Three categories of damage modifiers exist, and they all stack additively with one another:
- Generic modifiers: apply to all damage received by an entity, regardless of damage type or source.
- DamageSource modifiers: apply only when the damage originates from a specific
DamageSourceSO. - DamageType modifiers: apply only when the damage is of a specific
DamageTypeSO.
Generic Damage Modifiers
Generic modifiers are configured in the AstraHealthConfigSO asset and apply universally to every instance of damage received by an entity. The two relevant fields are Generic Flat Damage Modification Stat and Generic Percentage Damage Modification Stat, described in detail in the Package Configuration page.
As a quick recap:
- Generic Flat Damage Modification Stat: a
Statwhose value is added to (or subtracted from) the incoming damage amount as a flat quantity. A positive value increases the damage received; a negative value decreases it. - Generic Percentage Damage Modification Stat: a
Statwhose value is applied as a percentage modification to the incoming damage. A value of 20 means +20% more damage received; a value of −20 means −20% less damage received.
DamageSource Modifiers
As already introduced in the Damage Sources section, each DamageSourceSO asset exposes a Percentage Modifier Stat and a Flat Modifier Stat. These work identically to the generic modifiers described above, but are applied only when the damage originates from that specific DamageSourceSO.
DamageType Modifiers
Similarly, each DamageTypeSO asset exposes a Percentage Modifier Stat and a Flat Modifier Stat in its Damage Modifiers inspector section. These work in the same way as the source-specific modifiers, but are applied only when the damage is of that specific DamageTypeSO. A typical use case is implementing elemental weaknesses and resistances: for example, a Fire Weakness stat could be assigned as the Percentage Modifier Stat of a Fire DamageTypeSO, so that entities with a positive value of that stat take proportionally more Fire damage.
Warning
As with DamageSourceSO modifiers, if the target entity lacks any statistic referenced by the Percentage Modifier Stat or Flat Modifier Stat fields on a DamageTypeSO, an error will be logged when applying damage of that type. Ensure that all entities with an EntityHealth component have the damage modifier statistics referenced by the DamageTypeSOs used in your game. A practical approach is the same suggested for DamageSourceSO modifiers: centralize all modifier stats in a dedicated StatSet and include it in the relevant entities' stat sets.
Stacking Behavior
When the ApplyFlatDmgModifiersStep and ApplyPercentageDmgModifiersStep steps are included in the active DamageCalculationStrategy (that we will see soon in the Damage Calculation Strategy section), all applicable modifiers of the same kind are summed additively into a single net value, which is then applied to the current damage amount in one operation.
For percentage modifiers, the system also performs individual immunity checks before summing: if the generic percentage modifier alone reaches −100 or below, the damage is fully prevented and the entity is flagged as immune to all damage for that hit; if the source- or type-specific modifier alone reaches −100 or below, the damage is prevented and the entity is flagged as immune to that specific source or type respectively.
Damage Calculation Pipeline
When you call TakeDamage on an EntityHealth, the raw damage amount you specify does not reach the entity's health pool directly. Instead, it passes through the Damage Calculation Pipeline: an ordered sequence of processing steps, each responsible for one aspect of the calculation — barriers, critical multipliers, modifiers, and defenses. Think of it as a production line: raw damage enters at the first station and is transformed by each step in turn; what exits the last step is what the entity actually loses from its health.
The strength of this design is its configurability. Which steps are active, and in what order, is defined entirely by a DamageCalculationStrategy asset that you set up in the Inspector — no scripting required. Different entities can use different strategies: a boss might have its own pipeline featuring an ApplyDamageCapStep as its final step — limiting incoming damage to at most 10% of the boss's max HP — while regular enemies fall back to the project-wide default. Strategies can also be swapped at runtime, enabling mechanics such as temporary invincibility phases or damage rules that change mid-encounter.
Internally, the pipeline runs its steps sequentially on a shared state object and short-circuits the moment damage is marked as prevented: if a barrier fully absorbs the hit, or a modifier grants immunity, all remaining steps are skipped and the result is returned immediately.
Pipeline Data Types
The pipeline uses a small set of dedicated types to keep concerns cleanly separated — there is one type for what you request, one for what flows through the steps, and one for what you receive back. As a designer integrating TakeDamage into your game code, you will interact with two of these directly: PreDamageContext to describe the damage you want to apply, and DamageResolutionContext to inspect the outcome. The others are managed internally by the pipeline and are primarily relevant if you are implementing custom steps or hooking into damage events for analytics or reactions.
PreDamageContext is the descriptor you build before calling TakeDamage. Its mandatory fields are enforced by a fluent step-builder that requires them in order: amount → type → damage source → target. The dealer entity (WithDealer) is optional and can be omitted when no specific entity is responsible for the damage (e.g. traps, environmental hazards, or system-initiated damage). Other optional fields include IsCritical, CriticalMultiplier, Ignore, Instigator, and IsReactable. Setting Ignore = true causes the pipeline to be bypassed entirely; the damage is flagged as prevented with PrePhaseIgnored before any calculation begins. IsReactable defaults to true and signals whether reactive systems (such as counter-damage actions) may respond to this event — set it to false when building a secondary effect to prevent chain reactions. See Preventing Infinite Cycles for details.
DamageInfo is the mutable state object that flows through the pipeline. It is constructed from a PreDamageContext at the start of TakeDamage and holds:
Amounts— aDamageAmountContexttracking the current damage value and step-by-step history.Type,DamageSourceSO,Target,Performer,IsCritical,CriticalMultiplier— metadata forwarded from thePreDamageContext.Reasons— aDamagePreventionReasonflags enum accumulating all reasons why damage was prevented.IsPrevented— returnstruewhenReasonsis notNone; used to short-circuit the pipeline.
DamageAmountContext tracks the numerical amount throughout the pipeline:
InitialAmount— the original raw value; never modified after construction.Current— the damage value as modified by each step; steps read and write this property.Records— a read-only list ofStepAmountRecordentries, each capturing the step type and the before/afterCurrentvalues for that step. Useful for debugging and diagnostics.
DamageResolutionContext is the value returned by TakeDamage. It contains:
Outcome—DamageOutcome.AppliedorDamageOutcome.Prevented.Reasons— the accumulatedDamagePreventionReasonflags when prevented;Nonewhen applied.TerminationStepType— theTypeof the step that caused early termination, if any.FinalDamageInfo— theDamageInfoat the end of the pipeline; may benullwhen damage was prevented in the pre-phase.PreDamageContext— the original input that initiated this damage attempt.IsReactable— propagated fromPreDamageContext.IsReactable. Whenfalse, reactive systems listening to damage resolution events should not respond to this outcome.
DamageOutcome is a two-value enum: Applied (damage was applied to the entity's health or barrier) and Prevented (damage was stopped before affecting the entity).
DamagePreventionReason is a flags enum that accumulates one or more reasons why damage was prevented:
| Value | When set |
|---|---|
None |
No prevention; damage can proceed. |
EntityImmune |
Target has global immunity (IsImmune = true on EntityHealth). |
AllDamageImmune |
Generic percentage damage mitigation stat alone reached ≤ −100%. |
DamageTypeImmune |
Type-specific percentage modifier alone reached ≤ −100%. |
DamageSourceImmune |
Source-specific percentage modifier alone reached ≤ −100%. |
BarrierAbsorbed |
Barrier fully absorbed the incoming damage. |
DefenseAbsorbed |
Defensive stat computation reduced damage to zero. |
PrePhaseIgnored |
PreDamageContext.Ignore was true before the pipeline started. |
PrePhaseZeroAmount |
PreDamageContext.Amount was zero or negative. |
PipelineReducedToZero |
A step reduced damage to zero without a more specific absorption reason. |
EntityDead |
Target was already dead when TakeDamage was called. |
Note
DamagePreventionReason is a flags enum: multiple values can be set simultaneously on the same damage attempt. Inspect DamageResolutionContext.Reasons to read all accumulated reasons after a call to TakeDamage.
Damage Step
Each station in the pipeline is a DamageStep — an independent, composable unit of work that applies one focused transformation to the damage in flight. The seven built-in steps cover the most common scenarios out of the box. If your game needs specialised behaviour — for example, a step that triggers a status effect when damage exceeds a certain threshold — you can implement a custom step by creating a class that inherits from DamageStep and implements ProcessStep().
Step order matters. Each step receives the output of the one before it, so a different arrangement of the same steps produces a different result. Placing a critical multiplier step before defensive steps amplifies the pre-mitigation damage; placing it after scales a lower, post-mitigation value. We will see how to compose and reorder steps from the Inspector in the Damage Calculation Strategy section.
DamageStep is the abstract base class for all pipeline steps. Each step performs one focused transformation on DamageInfo. The pipeline runner calls Process() on each step in order; concrete implementations override ProcessStep().
Process() enforces two preconditions automatically before delegating to ProcessStep():
- If
DamageInfo.IsPreventedistrue, the step is skipped. - If
DamageInfo.Amounts.Currentis ≤ 0, the step is skipped.
After ProcessStep() returns, Process() appends a StepAmountRecord to DamageAmountContext.Records with the before and after amounts. If the step brought a positive amount to zero without setting a more specific prevention reason, DamagePreventionReason.PipelineReducedToZero is set automatically.
The package includes seven built-in DamageStep implementations:
ApplyCriticalMultiplierStep
Critical hits deal amplified damage. This step multiplies the current damage amount by the critical hit multiplier when the incoming damage has been flagged as a critical strike. Its position in the pipeline is a design decision: placed before defensive steps, the multiplier scales raw (or modifier-adjusted) damage; placed after, it scales the already-mitigated result. Usually critical multipliers are applied early or as first step.
Scales the current damage by the critical hit multiplier when the damage is flagged as a critical hit. The step reads DamageInfo.IsCritical and DamageInfo.CriticalMultiplier. It is a no-op if IsCritical is false, or if the multiplier is ≤ 0 or exactly 1.0.
Both the critical flag and the multiplier are set in the PreDamageContext when building the damage request. A multiplier of 2.0 doubles the Current amount at the point where this step executes.
Note
The position of ApplyCriticalMultiplierStep in the pipeline determines what value the multiplier is applied to. Placing it before ApplyDefenseStep amplifies damage prior to defensive mitigation; placing it after scales post-defense damage. Design your strategy order accordingly.
Note
The multiplied amount is rounded to a long using the Critical Damage Multiplier Rounding Mode from HealthRoundingSettings (default: Round).
ApplyDefenseStep
This step applies the target entity's defensive stat for this damage type — the primary stat-based mitigation layer in a typical RPG setup. For example, for a Physical damage type with Armor as its Defensive Stat, this step reads the target's Armor value, optionally reduces it by any armor penetration, then feeds the result into the Damage Mitigation Fn to compute the mitigated damage. This is usually the step that eliminates most of the incoming damage for well-armored targets.
Applies defensive stat-based damage mitigation as configured in the DamageTypeSO. The step reads the Defensive Stat and Damage Mitigation Fn, and optionally the Defense Penetration Stat and Defense Penetration Fn (see Defense Penetration).
The step is a no-op when both Defensive Stat and Damage Mitigation Fn are unset — which is the intended configuration for a damage type that should never be mitigated by defenses. If the configuration is inconsistent (one field set, the other null), a warning is logged and the step is skipped. The effective defensive value is computed after applying any penetration reduction, then fed into the Damage Mitigation Fn to yield the final reduced amount. If the result is ≤ 0, DamagePreventionReason.DefenseAbsorbed is set.
Note
Two rounding modes from HealthRoundingSettings are applied within this step:
- Defense Penetration Rounding Mode — rounds the effective defense value after the defense-penetration function reduces it (only when defense penetration is configured).
- Damage Mitigation Rounding Mode — rounds the final damage amount returned by the damage-mitigation function.
ApplyBarrierStep
Barriers act as a temporary shield layer in front of an entity's health pool: incoming damage hits the barrier first, and only what the barrier cannot absorb continues on to the next step. This step is the mechanism behind shielding abilities and any temporary protective layer you implement with the barrier system. Its position in the pipeline determines how much barrier is actually consumed: placing it after ApplyDefenseStep means the barrier only ever sees damage that already survived defensive mitigation, so the barrier is drained more slowly. Placing it before defensive steps causes the barrier to absorb the full, unreduced hit — making it a purer shield but one that depletes faster.
Consumes the target entity's barrier (temporary shield) to reduce incoming damage before it reaches health. If the DamageTypeSO has Ignore Barrier enabled, this step is skipped entirely. If the target has no EntityHealth component or its barrier is zero, the step is also a no-op.
The step subtracts from DamageInfo.Amounts.Current the portion absorbed by the barrier, and reduces the entity's barrier by the same amount. If the barrier fully absorbs the hit, DamagePreventionReason.BarrierAbsorbed is set and the pipeline terminates. Damage that exceeds the barrier continues through subsequent steps as the updated Current value.
Note
ApplyBarrierStep does not reduce health directly. Any remaining damage after barrier absorption continues through the pipeline and is applied to health at the end of TakeDamage.
ApplyPercentageDmgModifiersStep
Percentage modifiers scale the incoming damage by a fraction. The three modifier layers (generic, source-specific, type-specific) each correspond to a stat whose value the target entity holds at runtime. A negative value reduces damage, a positive value amplifies it. When a single modifier layer reaches −100% or below on its own, the entity becomes immune to that entire category of damage for this hit.
Applies percentage-based damage modifiers from up to three layers, in order:
- Generic — reads
AstraHealthConfigSO.GenericPercentageDamageModificationStatfrom the target's stats. Skipped if theDamageTypeSOhas Ignore Generic Percentage Modifiers enabled. - DamageSource-specific — reads
DamageSourceSO.PercentageDamageModificationStatfrom the target's stats. - DamageType-specific — reads
DamageTypeSO.PercentageDamageModificationStatfrom the target's stats.
Each layer is evaluated individually for full immunity before contributions are summed. If the generic layer alone reaches ≤ −100%, DamagePreventionReason.AllDamageImmune is set and the step exits immediately. If the source-specific layer alone reaches ≤ −100%, DamagePreventionReason.DamageSourceImmune is set. If the type-specific layer alone reaches ≤ −100%, DamagePreventionReason.DamageTypeImmune is set. If no single layer triggers immunity, the three contributions are summed additively into a single net percentage applied to Current in one operation.
Note
If the cumulative percentage is ≤ −100%, DamageInfo.Amounts.Current clamps to a minimum of 0: percentage modifiers cannot bring damage below zero. In such case, the damage is prevented with DamagePreventionReason.PipelineReducedToZero.
Note
The scaled amount is rounded to a long using the Percentage Damage Modifier Rounding Mode from HealthRoundingSettings (default: Round).
ApplyFlatDmgModifiersStep
Where percentage modifiers scale damage proportionally, flat modifiers add or subtract a fixed amount regardless of the hit's magnitude. A −15 flat absorb always removes 15 damage, whether the incoming hit was 20 or 2000. Flat modifiers are typically placed after percentage modifiers so they adjust the already-scaled value — but you are free to order them as your game design requires.
Applies flat damage modifiers from the same three layers as ApplyPercentageDmgModifiersStep:
- Generic — reads
AstraHealthConfigSO.GenericFlatDamageModificationStatfrom the target's stats. Skipped if theDamageTypeSOhas Ignore Generic Flat Modifiers enabled. - DamageSource-specific — reads
DamageSourceSO.FlatDamageModificationStatfrom the target's stats. - DamageType-specific — reads
DamageTypeSO.FlatDamageModificationStatfrom the target's stats.
All three contributions are summed additively. The net value is added to or subtracted from DamageInfo.Amounts.Current.
Note
DamageInfo.Amounts.Current clamps to a minimum of 0: flat modifiers cannot bring damage below zero. In such case, the damage is prevented with DamagePreventionReason.PipelineReducedToZero.
Note
The conventional order is to run percentage modifiers before flat modifiers, so that flat additions or reductions are applied to the already-scaled value. This ordering is not enforced by the system; you can arrange steps freely.
ApplyDamageCapStep
Enforces an upper bound on the damage an entity can receive from a single hit. Place this step wherever your design requires — typically at the end of the pipeline — to prevent any single attack from dealing more damage than the configured limit, regardless of multipliers, modifiers, or critical hits that may have amplified the amount.
The step looks for a component implementing IDamageCap on the target entity (see Damage Bound Components). If no such component is present, the step is a no-op. When a provider is found, the step clamps DamageAmountContext.Current to at most the value returned by IDamageCap.GetDamageCap(). A cap value of 0 or below is treated as a misconfiguration and ignored.
Note
If the cap reduces Current to exactly 0, DamagePreventionReason.PipelineReducedToZero is set automatically by the base class.
ApplyDamageFloorStep
Guarantees a minimum damage an entity receives from a single hit, provided the damage has not already been fully prevented by an earlier step. Use this to implement mechanics such as "this hit always deals at least N damage" — ensuring that heavy mitigation from armor, barriers, or modifiers never reduces the effective hit below a design-defined baseline.
The step looks for a component implementing IDamageFloor on the target entity (see Damage Bound Components). If no such component is present, the step is a no-op. When a provider is found and Current is below the floor, the step raises Current to that floor value. A floor value of 0 or below is treated as a misconfiguration and ignored.
Important
DamageStep.Process() skips any step when Current is already ≤ 0 or the damage is already prevented. ApplyDamageFloorStep therefore cannot restore damage that was fully absorbed by an earlier step (for example, by a barrier that brought Current to zero). To guarantee a minimum amount even after heavy mitigation, place this step before the reducing steps in the pipeline.
Damage Bound Components
ApplyDamageCapStep and ApplyDamageFloorStep are pure logic steps — they do not hold the bound value themselves. The value is provided at runtime by a component attached to the target entity that implements one of two interfaces: IDamageCap (upper bound) or IDamageFloor (lower bound). The package ships a concrete MonoBehaviour implementation for each, but the interfaces are also the extension point if you want to provide a custom bound from your own component.
DamageCap— implementsIDamageCap. Attach it alongsideEntityHealthon an entity to activate an upper bound on incoming damage.ApplyDamageCapStepqueries it viaGetDamageCap().DamageFloor— implementsIDamageFloor. Attach it alongsideEntityHealthon an entity to activate a lower bound on incoming damage.ApplyDamageFloorStepqueries it viaGetDamageFloor().
Both components share the same configuration structure. The Source field (a DamageBoundSource enum) selects how the bound value is computed at runtime:
- Fixed Value — a constant
longconfigured directly on the component (e.g., "never take more than 200 damage per hit"). - Health Scaling — a fraction of a chosen health metric at the moment the step executes. Two inline fields control the result: Health Metric (Current HP, Max HP, or Missing HP) and Portion (0.0 to 1.0). Setting Health Metric to Max HP and Portion to 0.1, for instance, yields a cap or floor equal to 10% of the entity's max HP — evaluated dynamically each time a hit is processed. This mode effectively inlines the same idea exposed by
HealthScalingComponentSO, but without requiring a separate asset. - Scaling Component — delegates the calculation to any
ScalingComponentScriptableObject asset. Useful when the bound logic is already captured in a reusable scaling asset, or when it depends on values beyond the entity's health pool. AnyScalingComponentsubtype is valid, includingHealthScalingComponentSO.
The inspector adapts to the selected source, showing only the fields relevant to the current mode:


DamageFloor has an identical inspector layout; only the semantic meaning of the value changes.
Warning
Both DamageCap and DamageFloor require an EntityCore component on the same GameObject. The Health Scaling source additionally requires an EntityHealth component on the same entity. If EntityHealth is missing when Health Scaling is selected, a warning is logged at runtime and the bound evaluates to 0, effectively disabling it for that hit.
The Scaling Component source also silently becomes ineffective if no asset is assigned: the component returns 0, and the corresponding cap or floor is ignored for that hit. The custom editor surfaces this with a warning box in the Inspector.
Damage Calculation Strategy
Relative path: Damage Calculation Strategy
Rather than embedding damage calculation logic in scripts, Astra Health externalises the pipeline into a DamageCalculationStrategy asset — a ScriptableObject you control entirely from the Inspector. Each strategy holds an ordered list of steps; changing the list changes the pipeline. This separation lets you design, tune, and swap calculation behaviours without touching any code. A boss encounter can use a custom strategy with a specific subset of steps (e.g., an ApplyDamageCapStep as its final step that limits the incoming damage to a maximum of 10% of the Max HP); regular enemies fall back to the project-wide default; a runtime debuff can temporarily replace an entity's strategy to alter how it takes damage during a special encounter phase (e.g., all lightning damage is doubled).
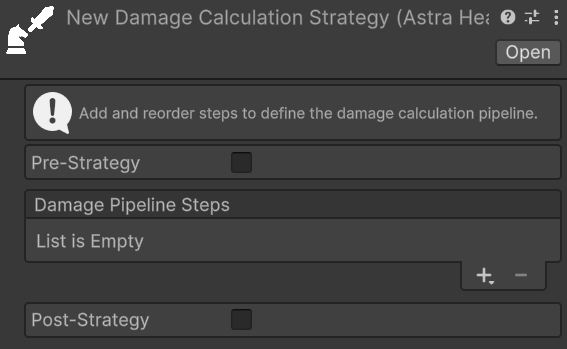
In the Inspector, the strategy exposes a reorderable list labelled Damage Pipeline Steps. Steps can be added via a type-selection dropdown (the "Step" suffix is trimmed from display names for readability), removed, and reordered via drag. A newly created, empty strategy looks like this:
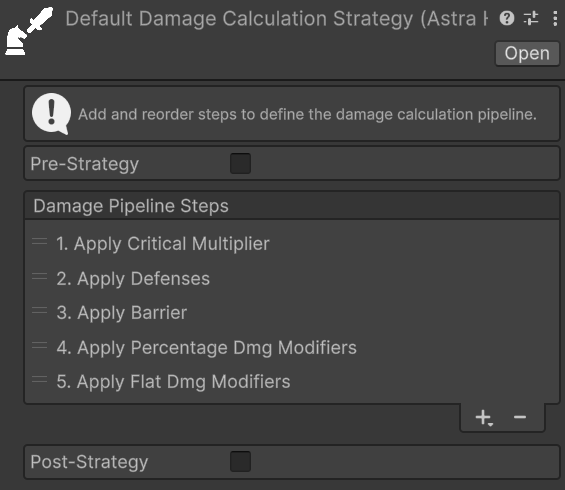
Once steps are added and arranged, the Inspector shows them as a numbered list reflecting the execution order:
Every EntityHealth component resolves the active strategy at runtime through a three-tier priority:
- Override Damage Calculation Strategy — takes precedence over all other settings. Intended for temporary runtime effects (e.g., a debuff that temporarily changes how an entity takes damage) or for testing when a custom strategy is already assigned.
- Custom Damage Calculation Strategy — an entity-specific strategy that overrides the global default but can itself be overridden at runtime by the tier above.
- Default Damage Calculation Strategy — configured in
AstraHealthConfigSOand applied to every entity that defines neither a custom nor an override strategy.
Important
If no strategy is resolved — neither custom nor override is set on the entity, and no default is configured in AstraHealthConfigSO — TakeDamage logs an error and the pipeline does not run.
Extending a Strategy Without Duplication
A common pattern is building a specialised pipeline by extending the project-wide default. For example, a boss entity might need all the same mitigation steps as regular enemies, plus one extra capping step. Maintaining two separate assets with identical steps creates a maintenance burden: every change to the default pipeline must be manually replicated in every dependent asset.
To address this, each DamageCalculationStrategySO exposes a Pre-Strategy section above the step list and a Post-Strategy section below it. When enabled, each section executes an entire other strategy before or after the steps defined on the current asset, without duplicating any step.
Both sections share the same layout:
- Enabled toggle — when enabled, the strategy in this section will run before (for Pre) or after (for Post) the steps defined on this asset.
- Use Default Pipeline checkbox — when checked, the global default
DamageCalculationStrategyconfigured inAstraHealthConfigSOis used. When unchecked, a Custom Strategy drag-and-drop field appears to assign any otherDamageCalculationStrategySOasset explicitly.
A typical example: to create a boss pipeline that applies all standard mitigation and then limits incoming damage to 10% of the boss's max HP, configure the strategy asset as follows:
- Pre-Strategy: enabled → Use Default Pipeline checked (runs the project-wide default pipeline first).
- Own steps:
ApplyDamageCapStep(with aDamageCapcomponent on the boss, Source set to Health Scaling, Max HP, 0.1). - Post-Strategy: disabled.
With this setup, any change to the default pipeline is automatically picked up by the boss strategy — no duplication required.
Caution
The system includes a recursion guard that prevents a strategy from executing itself directly or indirectly. If a cycle is detected at runtime — for example, Strategy A uses Strategy B as its post-strategy, and Strategy B uses Strategy A as its pre-strategy — a warning is logged and the repeated execution is skipped. Design strategy chains as directed acyclic graphs to avoid this.